Category: Uncategorized
What are the technical requirements/limitations of Carleton College?
Carleton College uses a Web server known as a LAMP server. “LAMP” is an acronym for the technology stack that is installed on the server:
-
Linux: This is the open-source operating system that is used on the server.
-
Apache: This is the Web server software that the server uses.
-
MySQL: This is the database software that the server uses.
-
Php/Perl/Python: These are the three programming languages that the server can interpret.
Generally, if you are using applications available to install by default through the sites.carleton.edu, you shouldn’t need to worry about these technical details. All of the software that is available for installation (in cPanel) meets the technical requirements.
If you’re interested in finding/installing another application (that isn’t available through our automatic installer tool), then you’ll have to be sure that the server can support it. To start with, you’ll want to be sure that the Web application can run on a LAMP server. Check the technical requirements for the application to determine this. You’ll also need to do some research about whether there are any additional services or modules required on the server. Some software may require components that aren’t included in the default installation of the LAMP stack. In that case, contact Reclaim Hosting with details about what you need, and we’ll see what we can do.
Map Your Domain to Blogger
Mapping your domain is an important part of sites.carleton.edu; it reinforces the idea that you don’t necessarily need to host all your own applications. You should, however, be mindful of making your web presences part of a domain you control. If you would like to map a subdomain and have not yet created it, use this tutorial on creating subdomains before proceeding. To map your domain, or a subdomain, to Blogger, use these steps:
- Log in and navigate to your cPanel. Click the Search box at the top, right-hand corner and type “DNS” (without the quotes).
- Click on the Zone Editor icon.
- Find the domain (or subdomain) you want to map to Blogger in the list and click Manage.
-
Create a new CNAME record by clicking Add Record. To save, click Add Record.
 Keep this window open; you will need it in later steps.
 -
In a new window, go to the Blogger website, and login with your Blogger/Google username and password.
-
From your Blogger Dashboard, find the blog you’d like to use, expand the More Options menu, and click Settings.
-
On the “Basic Settings” page, find the Publishing section, and click the Setup a 3rd party URL for your blog link.
-
Under Advanced Settings, type the full subdomain or domain you are mapping into the box, leave the Use missing files host? option set to No, then click Save.
-
You will be presented with a message that your domain cannot be verified, along with information about your existing DNS entry, and an additional DNS entry that needs to be made. This is normal. Copy the second entry under the Name, Label, or Host entry to your clipboard.
-
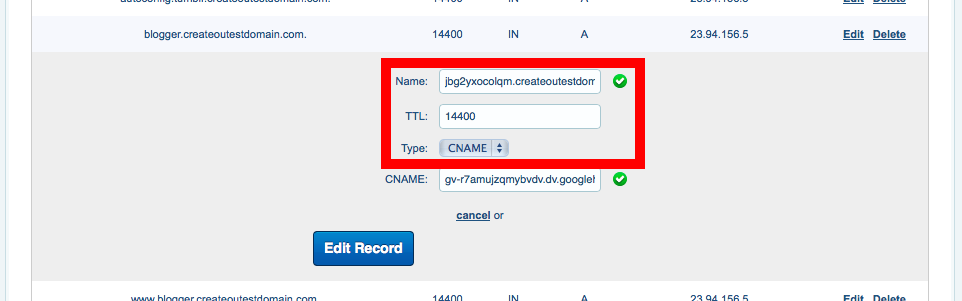
Go back to the window or tab containing the Zone Editor in your Carleton College Sites cPanel. Create another records by clicking Add a Record. Paste the text you just copied into the Name field. This information will be different for each domain. Set the TTL field to 14400, and the Type drop-down menu to CNAME.
-
Go back to the window or tab containing the Blogger Advanced settings panel, and copy the second entry under the Destination, Target, or Points to column to your clipboard.
-
Go back to the window or tab containing the Advanced DNS Zone Editor in your sites.carleton.edu cPanel. In the Zone File Records section, find the domain you were editing Action for and paste the text you just copied into the CNAME field. This information will be different for each domain. Click Add record when you are done.
-
Return to the window or tab containing the Blogger Advanced settings panel, and click Save.
-
If everything was successful, your domain will now appear as the Blog Address. Keep in mind that it may take up to 72 hours for your domain or subdomain to correctly point all visitors to the correct location.
For further instructions, click here.
LAMP Environments
Here are a few things you need to know about the Web host that will make it easier to understand what you can do with your new space.
The Web Server
The Web server is the main computer that is associated with the sites.carleton.edu hosting account. It is literally a computer that has special software on it that allows it to be accessible via the Web. The files that run your applications, images, video, or any other files you upload into your Web space are stored on this server.
(For comparison’s sake, your desktop or laptop computer, by default, doesn’t allow this; I can’t access files on your computer through a Web browser by default. You can actually install Web server software on your own computer, however, essentially making your files accessible over the Web.)
In order to run properly, a Web server has to have an operating system installed and some kind of Web server software. Our Carleton College hosting environment runs the LINUX operating system and an APACHE Web server.
The Database Server
In addition to the Web server, there is also an associated database server. This is another computer, but it is configured with software that allows it to host databases. It is also connected to your Web server so that your applications (hosted on the Web server) can retrieve data (from databases hosted on the database server).
Databases come in many varieties. The kind of database you can use for a Web application depends on the kind of software that’s installed on the database server. Our Carleton College hosting environment runs MYSQL databases.
The Programming Language
When you install open-source software on your Web account, it’s going to be written in a programming language. Our Carleton College hosting environment has software installed on it that allows it to understand different programming languages. If you install software that’s written in a language that your Web server doesn’t read, it won’t work.
The Carleton College Sites hosting environment can currently interpret PHP, PERL, and PYTHON.
Add it Together: LAMP
If you take a look at all the descriptions above, you can determine that we are running what is known as a LAMP server for sites.carleton.edu:
-
Linux (operating system)
-
Apache (Web server)
-
MySQL (database server)
-
PHP/PERL/PYTHON (programming language)
Applications that are written for LAMP environments will, presumably, run on the server. However, some applications do require additional extensions or libraries that aren’t included in a LAMP environment by default. The applications you can install via Installatron (in cPanel) should work just fine.
LAMP environments are unique because all components are open-source, meaning Linux, Apache, MySQL, PHP, PERL, and PYTHON are open for anyone to use for free. Anyone can also modify them and redistribute them. As a result, there are lots of online resources for using these systems that have been built by their communities of users. But, also as a result, since you’re not paying for these systems, you can’t just call up a company and ask them to fix a problem.
Map Your Domain to Tumblr
Mapping your domain is an important part of sites.carleton.edu; it reinforces the idea that you don’t necessarily need to host all your own applications. You should, however, be mindful of making your web presences part of a domain you control. If you would like to map a subdomain and have not yet created it, use this tutorial on creating subdomains before proceeding. To map your domain, or a subdomain, to Tumblr, use these steps:
- Log in and navigate to your cPanel. Click the Search box at the top, right-hand corner and type “DNS” (without the quotes). As you type, the cPanel page will begin to narrow down results.
- Find and click on Zone Editor to continue.
-
Find the domain, or subdomain, you want to map to Tumblr in the list of Zone File Records. Click Manage next to the proper domain.
-
Leave the Name, and TTL fields set to their defaults. Update the Type drop-down menu to CNAME, and the Address field to domains.tumblr.com. Click Edit Record when you are done.
-
Visit the Tumblr website, and login with your Tumblr username and password.
-
After logging in, click the Tumblr Settings icon.
-
For the Tumblog you’d like to use under the Username click the pencil icon to edit these settings.
-
Check the Use a custom domain checkbox. Type the name of the domain or subdomain you want to map to Tumblr into the box, then click Test your domain.
-
If your domain mapping was successful, you’ll see a message that your domain is now pointing to Tumblr. Click the Save button before leaving the page. Keep in mind that it may take up to 72 hours for your domain or subdomain to correctly point all visitors to the correct location.
Static and Dynamic Websites
Static Websites
In the early days of the Web, almost all Web sites were what is known as 'static sites.' Content (text, images, video, audio, etc), was placed or embedded in a file in which HTML tags were used to format it. If you looked at the actual contents of the file, you might see something like this:

The content and the tags lived side-by-side. To edit the page, you’d open up the file (on your own computer) in a program capable of editing HTML files and make changes to either the content or the presentation. Every page had to be edited individually, even if the edits you were making were for common elements that appeared on many pages (like menu bars).
From a technical perspective, accessing a static Web site is fairly straightforward. When your computer is connected to the Internet, you can use a Web browser to access files on a Web server (as long as you know the address). The Web server delivers the contents of those files to your browser, and your browser displays them.
Dynamic Websites
Over time, as the Web became more sophisticated, new systems emerged for creating and managing Web sites. These moved beyond the model of having content and HTML tags live in a simple HTML page which your browser accessed and displayed. Instead, these systems were Web applications – software that literally runs on the Web server and makes it possible to manage a Web site, often with very sophisticated features. One feature of these applications is that they separate content and presentation by storing most content (your text, images, etc) and data about the site (the title, options, etc). in a database.
On the Web server, the Web application installs files that are written in some kind of programming language. The server reads this code and obeys any requests in it to access data in the database (which lives on a separate server) and displays it according to the instructions in the code.

Essentially, the data for the site (living in a series of tables in a database on the database server) is entirely separate from the actual presentation of the site (living in the code of the programmed files on the Web server). Special software on both the Web server and the Database server enable the two to speak to each other and work together.
One of the benefits of using a Web application is that you usually don’t need to touch (or even look at!) the code in order to make changes to your content. In addition, editing the site usually involves accessing some kind of control panel through your Web browser and filling out a form, instead of having to download and access files in software on your own computer.
Dynamic vs Static Content
Sometimes when we talk about the difference between dynamic and static content we get bogged down in the idea of whether or not the content is “fresh” (dynamic, regularly updated) or “old” (static, never updated). How frequently you update your content has nothing to do with what kind of system you are using to manage your site. You can manage a static Web site (as described above) and update the content every day. You can also have a dynamic Web site (running something like WordPress) and never change the content after you create it.
Generally speaking, it is easier to regularly update content on a dynamic Web site because the Web application just makes it easier. Sometimes, even when you just want a very basic page or placeholder, it’s easier to install a Web application (and only put up a single page) then to manually create an HTML page and upload it.
A Side Note about Separating Content from Presentation: Style Sheets
Another aspect of separating content from presentation involves the use of 'Cascading Style Sheets' (CSS). These are special files that live on your Web server and are linked to your Web pages. They contain information (written in a special markup language) about how to make elements on your site look. For example, they allow you to define in a single location what all Level 1 Headings look like on your site. They are an important aspect of understanding how to separate content from presentation, but they’re not really an aspect of the difference between static and dynamic sites. Both static and dynamic sites can use style sheets.
What is Domain Mapping?
Domain mapping, simply put, is deciding where visitors should be directed when they visit various pieces of your website. Domains and subdomains can be mapped directly to folders located within your webhosting account, where you may have installed WordPress, Omeka, MediaWiki, or other web applications. Domains and subdomains can also be mapped to some third-party providers.
What Exactly is a Web Application?
In the most general terms, a Web application is a piece of software that runs on a Web server. A Web server is a just a specialized computer designed to host Web pages.
Most Web applications are comprised of two components: files and a database. When you install a Web application, you will need to make sure all of the files are copied over into the appropriate location AND that a database (and database user) has been set up to connect to those files. Often, you will have to do some configuration to make sure the application knows how to access the database.
The system we use for Carleton College uses a special script installer called Installatron (in cPanel) that allows you to automatically install dozens of open source applications. When you use Installatron, you don’t need to worry about moving files, creating databases, or doing the initial configuration. It’s all taken care of for you.
In order to run on the Carleton College server, Web applications must be able to run on a LAMP server, which is the particular kind of Web server that we use. Occasionally, a Web application may require additional components or modules that need to be installed on the server.
What is DNS?
Remember back before everyone had computers that fit in their pocket, how companies would ship a book full of phone numbers to your doorstep? We might have known who we were looking for, but we needed to look up phone numbers unless they were your crazy relatives that you learned to memorize. When you get your own domain name, by default it’s nothing more than a shortcut, an address, or (to fit this very imperfect analogy) a phone number. When you type a domain name into the address bar of your browser, someone has to identify it and tell it what to display. That’s where a name server comes in.
A name server is a computer, running as a server, that keeps a record of all the domain names that are associated with it and keeps track of where those domains should go. In the case of sites.carleton.edu, the nameserver is the same computer that runs the hosting. You can peek under the hood and see this in action by going to the Websites and Domains tab of your cPanel account and clicking on DNS Settings. DNS stands for Domain Name System and the name server on sites.carleton.edu gives control to it to identify what should be displayed when someone types in your domain. Consider the fact that you might have one or more subdomains in your account. The name server and DNS are able to identify those subdomains and let the world wide web know that they exist and point to some files/folders on a computer somewhere.
When you signed up for a domain through the sites.carleton.edu system your nameservers were chosen for you. So when people type in your address, the server responds with information about your account. When you migrate an account away from one hosting platform like sites.carleton.edu and onto a new service, it will require you to change the nameservers so that your domain name points to a new server with its own files and structure. It’s also possible to have subdomains that point to entirely different servers than sites.carleton.edu.
What Can You Do with Your Account?
Your ability to do things on Carleton College is dictated to a large degree by the limits of your imagination. That said, there are some technical requirements and limitations that you should be aware of and might want to review.
To spark your imagination, here are some ideas that might help you get started:
Install a Web Application in Your Space
Carleton College makes it very simple to install certain Web applications in your Web space. Web applications are just special software that run on a web server. Usually, they allow you to build and manage a website. The kind of site you can build depends on the type of application you install. Here are some examples of applications that you can easily install within the sites.carleton.edu web hosting interface:
 WordPress: WordPress is a simple-to-use blogging application. The tool also comes with a huge array of plugins & themes to allow you to create virtually any kind of website imaginable. We have guides on using WordPress here.
Omeka: Omeka is an open-source web application that can be used to create and display online digital collections and archives. We have information available to help you install and use Omeka here.
 Scalar: Scalar is a content management system with the idea of creating non-linear books on the web. You can learn more about its functions and how to install it here.

Grav: Grav is an open source, flat-file CMS made for folks who are looking for something a little more experimental. Grav provides a straightforward framework for creating pages and inserting media. We have additional resources for Grav here.
 Mediawiki: It is the open-source wiki software that runs the online encyclopedia, Wikipedia. This tool may be right for you if you’re interested in publishing documents and then collaborating with others on them. Find our guides on Mediawiki here.
These are just a few of the open-source applications that are available to you in your Carleton College web space. We encourage you to read more about what Web applications are and which ones are available to you through this project.
Organize Your Site with Subdomains and Folders
Through this project, you’ve received a domain name that you can actually subdivide and organize anyway you like. One easy way to organize your domain is to create subdomains, in which you can then install other applications. In addition, you can just set up subfolders for your site (which can also have their own applications installed in them). Here’s an example of how you might organize your site (using the subdomain vs. the subfolder approach)
| Subdomain Approach | Subfolder Approach | |
| yourdomain.com (“root”) | Install WordPress as your “main site” | yourdomain.com (“root”) |
| course1.yourdomain.com | Install a second WordPress instance for a course you’re taking | yourdomain.com/course1 |
| photos.yourdomain.com | Install ZenPhoto for a public photo gallery of your photos | yourdomain.com/photos |
| docs.yourdomain.com | Install MediaWiki for a club you belong to that wants to collaboratively edit its bylaws | yourdomain.com/docs |
| files.yourdomain.com | Install OwnCloud so you can access your files on your laptop and at work | yourdomain.com/files |
This is just an example of a way to organize your site and then use different sections to do different things. There is no one solution to this challenge, and what you do should be driven by what makes sense to you. To start, you may just want to install one thing at the “root” of your domain, and then let the rest evolve as you get to know more about what’s possible.
Map Your Domain (or a Subdomain)
If you already have a digital presence that you’d like to pull into your Carleton College space, domain mapping is an option you may wish to explore. This allows you to assign your domain (or a subdomain) to another service. Some services that work with domain mapping are:
When you map a domain, users who visit your URL will automatically see your space on one of these services. It’s a great way to incorporate your activity elsewhere into your domain, and it might be a good first step if you’ve already established a presence somewhere else and just want to point your new domain to that space. Talk to Academic Technology for help doing this!